I am currently in the process of posting some of my handmade items for sale on ebay and etsy. Please check them out! I will be adding slowly but surely each day so check back often and please help spread the love of Madame Craftsalot. You can still get it in time for Christmas. I will be posting more coasters, purses, serving trays, wall art, kids decor, stationery and more.
Stay tuned for art you can handle!
Check out ebay at http://search-desc.ebay.com/madamecraftsalot_W0QQfromZR41QQftsZ2
and my ETSY shop at http://www.madamecraftsalot.etsy.com
Happy crafting,
Madame Craftsalot
www.madamecraftsalot.com
Tuesday, December 11, 2007
Buy Handmade Pledge
I found this while surfing and immediately took the Pledge. Last I checked, you could see my pledge on page #2. I hope you do it too! Just visit www.buyhandmade.org and repeat after me:
"I Pledge to buy handmade this holiday season, and request that others do the same for me!"
This is a great idea and a great site regardless of this pledge. Lots of great links. Check it out!
Happy Crafting,
Madame Craftsalot
"I Pledge to buy handmade this holiday season, and request that others do the same for me!"
This is a great idea and a great site regardless of this pledge. Lots of great links. Check it out!
Happy Crafting,
Madame Craftsalot
Tuesday, December 4, 2007
Decoupage

I had been a little frustrated with decoupage lately. In particular with bubbles forming as I tried to clear coat and protect. I believe that it may help to let the base coat dry overnight or longer, need to investigate further by experimenting more. And by base coat I mean the very first coat that you use to apply/adhere your paper to your surface. I just bought a book to help me figure this problem out too. Get this, it is all about glue. I just got it so I am still reading it. But the book teaches you about different types of glue and gives sample projects. It looks good and helpful. I figured it couldn't hurt. Oh, the book is The Crafter's Guide to Glue: Techniques & Projects by Pattie Donham. I bought it at amazon. I am going to experiment more with different base coat glues. I feel that the main problem is that the paper isn't staying stuck to the base surface. As I go thru trial and error, I will post more. What I have found already is that less glue is more as far as sealing it. Meaning it leaves less streaks. You have to do a lot of coats, sometimes up to 7 or 8 to really protect it, but it works pretty good. Here are links so some of my successful decoupage projects:
If anyone has more tips, please feel free to comment.
Happy Crafting,
Madame Craftsalot
www.madamecraftsalot.com
Friday, November 30, 2007
Whimsical Women


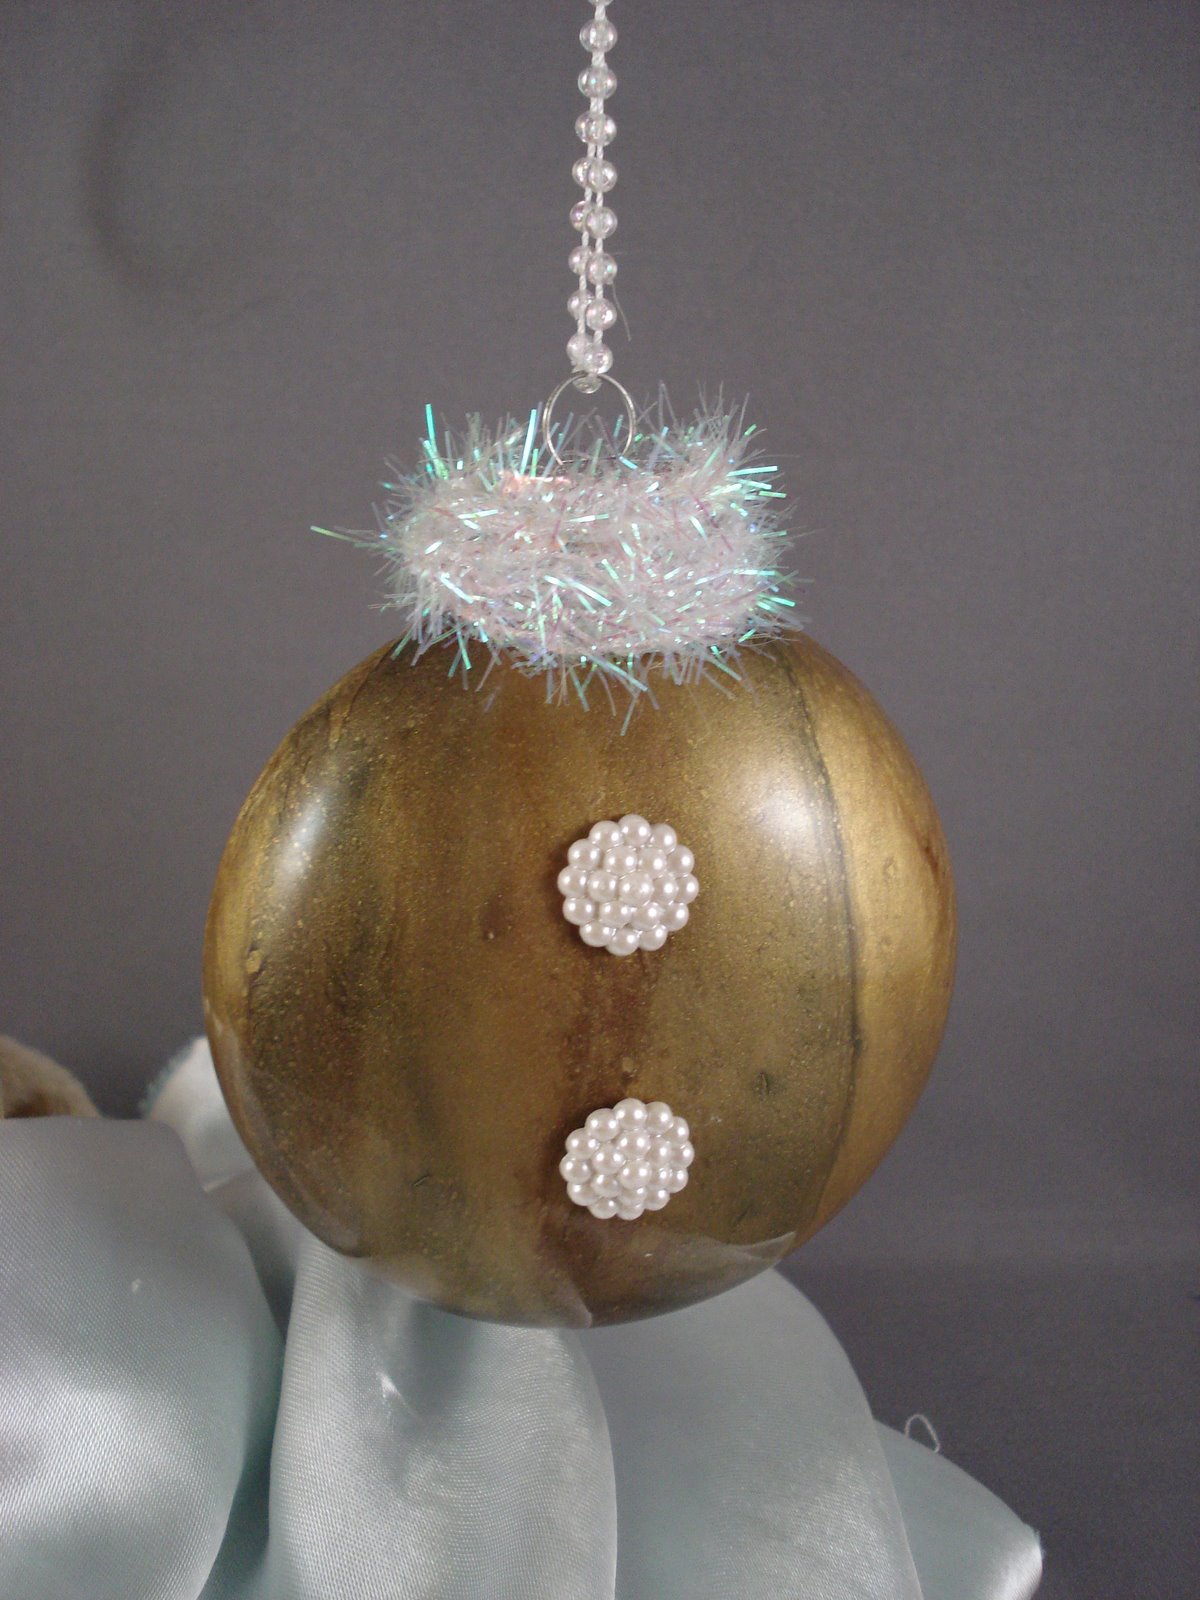
Woohoo! The Whimisical Women show was a huge success...for me and for all. It was our largest show yet between artists and sales. Congrats to all. We have over 50 different artists represented. Some great talent! It was my personal best too so hooray for me. My blood, sweat and sticky fingers paid off. I posted a bunch of photos of my goods on my flickr account and included a few here. I sold a lot of my coasters, ornaments and sold out my trays! I grew a little attached to my ornaments so parting with some was hard - these are 3 of my faves. They are all hand-painted and embellished. My friends even named some of them. They felt they were so cute and deserving of names. We have Royalty, Cardigan and Santa Baby. I can't wait to do more. You can see more on my flickr account. Feel free to share your thoughts!
Happy Crafting,
Happy Crafting,
Madame Craftsalot
www.madamecraftsalot.com
Cool site
I was surfing HGTV the other night for holiday decor inspiration and came across this link: Share My Craft. Crafters and artists post projects and others can rate and comment. I added one of my ornaments to try it out. I like to see what other people are making. Kinda fun.
Happy Crafting!
Madame Craftsalot
Happy Crafting!
Madame Craftsalot
Wednesday, October 24, 2007
Upcoming shows
Where have I been? Locked up in my workshop every spare second Iget. I have three upcoming shows that I will be selling at, and 2are on the same weekend. Yikes.
Festival of Trees
http://www.brennerchildrens.org/FOB/fot.htm
Come see us at the "Embellished" Booth. I am sharing the booth with 3 other talented women. It is our first time doing this. Yikes!
LOCATION: Education Building on the Dixie Classic Fairgrounds
ADMISSION: TICKETS SOLD ONLY AT THE DOOR Adults-$6, Children ages 2-12 years old-$4
DATES AND TIMES: Saturday, November 17, 2007, 9 a.m.-6 p.m.Sunday, November 18, 2007, 12-5 p.m.
PARKING FREE: enter through Coliseum VIP Parking entrance off of 27th Street(entrance behind Goodwill)
----------------------------------------------------------
My second show which is the same weekend as FOT
11TH ANNUAL WHIMSICAL WOMEN FALL SALE
In beautiful downtown Pfafftown
Saturday November 17, 2007 Raindate: Sunday November 18
2233 Vienna-Dozier Road Pfafftown, NC
10 AM – 2 PM
Join us for a peaceful day of Whimsical Art, Fine Fellowship andFabulous Food & Drink. There are over 45 different female artistswho will be selling their art and whimsical creations. It is a veryFUN event. Admission into this event is free.(If you want directions or to be added to my evite list for this event, please email me directly)
-------------------------------------------------------------
My final event (unless I decide to do more) is
The Holiday Market at New Philadelphia Preschool
Saturday, Dec. 8th from 9am - 2pm
4440 Country Club Rd Winston Salem, NC
336 768-4844
www.npmc.org
Approximately 13 vendors with great gifts for the upcoming holiday season.
I have been busy making a number of new items and hope to post some pictures soon. I have made handpainted ornaments, decoupaged mirrors, purses, coasters, memo boards, serving trays, jewelry and more.
That's all she wrote for now. I am off to go attempt to paint some baby shoes either to wear, for decoration or even to turn them into bookends or something. If you come to any of the events, please stop by and say hi. Introduce yourself if I don't already know you!
Happy Crafting,
MB
aka Madame Craftsalot
Monday, June 25, 2007
Flickr Photos
I just joined and posted some new pix at Flickr. It is so easy to use! I love it! Please check it out!
http://www.flickr.com/photos/craftsalot/
Happy Crafting,
MB
www.madamecraftsalot.com
http://www.flickr.com/photos/craftsalot/
Happy Crafting,
MB
www.madamecraftsalot.com
Thursday, May 31, 2007
Good news and new photos


I have great news...you can now find some of my collection at the new retail store called "Signatures by Carolina" on Trade St. in Winston-Salem. It is a great new store in the heart of the art district. It is located directly across from the fabulous restaurant Sweet Potatoes and kitty corner to the Millenium Center. She carries a variety of my creations from coasters, trays, love letter block, purses and more. So stop on by and tell her Marybeth sent you!
I posted some pix of my latest creations. If you see anything you would like to purchase, please let me know!
Happy Crafting,
MB
Madame Craftsalot
www.madamecraftsalot.com
Thursday, May 24, 2007
Join the Craftsalot Yahoo Group
Calling all artists and crafters in the Piedmont Triad Area. Please join the new Craftsalot group at http://groups.yahoo.com/group/craftsalot/. It is a place where we can go to share info. about upcoming event opportunities, new techniques, tips, etc. A fun and friendly environment where we can help each other grow and cultivate our individual talents.
Happy Crafting,
Madame Craftsalot
Happy Crafting,
Madame Craftsalot
Wednesday, May 23, 2007
Yahoo Group
I am in the process of starting a Yahoo! Group. It is totally under construction, but please feel free to join in! The more the merrier. This will help the group become so much more resourceful, and that much quicker, with new member comments, questions, tips, etc. So, come on board! Just go to
http://groups.yahoo.com/group/craftsalot/ to sign up.
Happy Crafting,
Madame Craftsalot
www.madamecraftsalot.com
http://groups.yahoo.com/group/craftsalot/ to sign up.
Happy Crafting,
Madame Craftsalot
www.madamecraftsalot.com
Website updated
I updated my website so check it out when you get a second. I still have a lot further to go with the design and content and will continue to work on it. I just have to balance my time between crafting and working on the web (which included learning how to do website while I do it! Ugh. Trial by fire.) Anyway, take a look: http://www.madamecraftsalot.com. It is easy to navigate.
Comments are always welcome.
Happy Crafting,
MB
Madame Craftsalot
Comments are always welcome.
Happy Crafting,
MB
Madame Craftsalot
Whimsical Women - a Success
Wow, what a great day we had at our 11th Annual Whimsical Women show. I think there were 48 total vendors. So many cool creations and so many talented women. AWESOME! The sale was a great success for both me personally and the group as a whole. We are doing 2 fall shows, one in Chapel Hill and one in Winston-Salem. One is in October and the other in November, which is where hasn't been determined yet so I will post that ASAP. Thanks to all our wonderful, loyal customers for attending. It looked like a good time was had by all! I love to be surrounded by women who have such a passion or creativity like myself. I can't live without it. It's good for my soul! I debuted a number of new items, as mentioned in my last blog and they were a hit. I think the faux tin tile coasters were a favorite. I loved that everyone had to touch them to see what they were. "They look just like real tin" was the most common comment! I was thrilled and flattered! I just bought a new camera and am waiting for a tabletop photo set to arrive (with lights and a good background) to take some professional pix of my new items: coasters, mirrors, rings, etc. I will post pix one I get that done. Good stuff!
Happy Crafting,
MB
aka Madame Craftsalot
Happy Crafting,
MB
aka Madame Craftsalot
Wednesday, May 9, 2007
Do it Yourself


OK, the problem with being a "Do It Yourselfer" is that you want to do everything yourself. That is me. I want to do everything myself from creating websites, new products, new businesses, etc. Did I mention that I have a toddler and an infant boy? Zoinks.
I haven't posted in awhile, but fear not, I have been busy in my studio crafting like a mad woman. I am prepping for a big show on May 12th. There are 40 different vendors. All woman, all handmade goods. It is called Whimsical Women and this is the 11th annual event. It is a great show if you are in the Winston Salem, NC area. Email me if you want the details. I have a bunch of new goods to be sold. I have made some new cigar box purses, funky fun rings, whimsical decor, vintage style wall hangins, pop art mirrors and so much more.
Once this show passes I will have more time to blog. Every spare momemt has been spent in my studio creating goods to be sold. I took a timeout today because I had a reaction to something I did yesterday. Not sure what it was because I had my hands in a lot of different paints, sealers, glues and sawdust. I included a couple of pix from some of my new creations. Kinda fun, right?
Oh, I just updated one of my websites. Check out www.madamecraftsalot.com. I am teaching myself how to do websites as I go along so it is a work in progress. I will add to it and my blog after the show. Wish me luck!
Happy Crafting,
Madame Craftsalot
Tuesday, March 20, 2007
Busy little crafter
Wow, it has been awhile since my last post but I have been one busy little crafter. I have taken a Precious Metal Clay Class and a Woodworking Class since my last post . I enrolled in another session of the woodworking class so I am in round two. I am making a toy chest for my oldest son. I will post pix once it is complete. I am almost done and then will work on some other fun smaller projects! I have a big show coming up in May so I need to create more unique items to sell.
The Precious Metal Clay class was amazing. I LOVED it. I made two silver necklace pendants, a ring and a pair of earrings. I will do a post on this topic so you can see all of my finished pieces. It was so fun and rewarding. I have received a lot of compliments when I wear them.
Stay tuned for more on both topics...
I also officially launched my Do It Yourself Workshops. I kicked it off with my Mom's Club and we all created adorable Decoupage purses. They came out great and the class was fun for all of us. I posted the Decoupage Purse as this month's project for you to create. The style opportunities are endless. Have fun with it! I am working on two more purses, so I will add photos of them once they are complete. Be sure to check out my other post with this fabulous project.
Happy Crafting,
Madame Craftsalot
Decoupage cigar style purse project

Art You Can Handle - Decoupage Purse Project
What is decoupage? The art of decoupage is the reformatting of paper by cutting and pasting it onto something else.
Materials:
Purse (unfinished cigar style available at craft stores in a variety of shapes and sizes), paper, glue (I use Mod Podge), acrylic paint, sealer, paper towel, Styrofoam plate, foam brushes, bowl of water, something to help smooth out paper (brayer or bone folder)
Instructions:
Select purse style
Select paper (wallpaper, wrapping paper, scrapbook paper, magazine clippings all work well. Ink jet prints do NOT work well, they will bleed unless you seal them first)
Trace purse pattern on the backside of the paper
Paint the inside of the purse and edges in a color that coordinates with your paper. This is so you don't have to worry if you paper edges match up perfectly. If they don't, the paint will help camouflage it.
While paint dries, cut out the purse pattern on the paper
Put white glue on Styrofoam plate and dilute with a little water (I use a spray bottle and do 2-3 squirts)
Use foam brush to spread white glue onto the purse, one section at a time. Place paper on top of glue. Smooth paper working from the center out. Wipe off any access glue that comes out the sides.
Be sure to get 100% coverage, especially on edges. Don’t worry if the glue gets on the front of the paper because we will be sealing it with the glue later.
Smooth out all air bubbles with your hand, bone folder or brayer.
Once you have completed decoupaging all sides of the purse, seal the entire paper surface with the same glue mixture. Let dry.
You can either seal again with the glue or use a clear polyurethane sealer to protect your purse from everyday wear and tear. I use Mod Podge glue and they suggest up to 5 or 6 coats.
Show off your new piece of art to all your friends
Project instruction by Marybeth Barrett.
Email: mb@madamecraftsalot.com Phone: 336.406.7072
Do It Yourself Classes Available in the Winston Salem, NC Area
Time Out Mat or Chair
Hand-Painted floor canvas
Decorative serving tray
Hand-Painted coasters
Decorative Memo Board
Hand-Painted placemats
Faux Finish Wall Art
Hand-Painted Growth Charts
Decoupage (purse, boxes, etc.)
Polymer Clay (Coming soon)
Whimsical Stationery, gift tags & more
Hand-made wrapping paper
Holiday Decorations
Photo Gifts
Contact us for more info. on attending or hosting a class.
Host a do it yourself themed Girls Night out or a fun bridal or baby shower !
Happy Crafting,
Madame Craftsalot
Wednesday, February 21, 2007
Dare to Dream...in vibrant color
This isn't my typical craft post, but as I stated in my profile, one of my hopes is to inspire people. I wanted to share a website with you. Debbie, who is one of my friends and former sports marketing co-workers, had a dream. She always wanted to open up her own retail shop. She didn't just do this on a whim. She was patient, strategic and waited for the right place and the right time. She was smart. Well, I am thrilled to say that she did it. She made her dream a reality. Orange is officially open and has been for a couple of months! Hooray! She has a storefront in Valrico, FL (near Tampa) but you can also check out her website and take a virtual tour. It is so cool. The name, concept, merchandise and her clever little tag lines are so colorful. She is an inspiration to me.
I too have a vision and a dream. I want to write a Do it Yourself craft book. There, I said it. It is officially out there in black and write print for any and all to see. I already have the title and a number of fun projects to share. Watching Debbie has made me realize and believe that it can happen. I just need to be patient, plan and continue to pursue my dream.
So, please take a minute and surf her site. If you are in the area, stop in her shop and tell her MB sent you. I can guarantee that you will find top quality merchandise and top notch customer service.
Congrats Debbie! I am so thrilled for you.
Sweet dreams,
Madame Craftsalot
Monday, February 19, 2007
Woodworking Toy Chest Project
I am in the middle of taking a woodworking class at the local tech college. Today was the first official day in the shop. I had a hard time trying to find a project to tackle. I finally chose a toy chest for my older son's bedroom. I got the free woodworking plans from the Georgia Pacific website, just scroll down and look for the toy chest PDF. I went to Lowe's with the two page print out in hand to get all of my supplies. I learned a lot in this visit. One, don't trust the staff to give you the right stuff. He over sold me two pieces of 4'x8' MDF (medium density fiberboard) sheets. That is A LOT! About $40 extra. I think I could have just bought 1 sheet of MDF, vs. the three they suggested. I showed him the plans and he estimated what I needed. I took his word for it. I learned that since these plans didn't total everything up and tell me what I needed that I should have figured it out myself. I just didn't know what size the MDF came in. But, once I did find that out I should have done the calculations myself. They had to cut the MDF to fit it in my Durango so I can't return it. Bummer! Lesson learned. I still like Lowe's though, but just be sure that you know exactly what you are getting. The sales staff is very busy and may not be able to give their 100% attention to you.
I also learned that MDF is VERY heavy. Even though the project called for MDF, I could have substituted plywood, which is a lot lighter. My final piece is going to be very heavy. I don't think I will be able to lift it. (Thank goodness for my hubby!) And finally, I also learned that MDF isn't as strong as plywood in longer lengths. It is NOT good for making long shelves b/c with a little pressure, it can just snap. So, hopefully my project still turns out OK. I think it will. I plan to put wood letters on the top spelling out my sons name to keep him from standing on it. It could handle his weight now but maybe not so much down the road as he grows. I don't want the top to snap so by adding the letters it will not only look cute but may prevent him from standing on it. We shall see. I will be sure to post a photo when I am done. I have another class on Thursday and get to use the table saw for the first time. Exciting and scary all at the same time. Wish me luck!
Happy Crafting,
Madame Craftsalot
Sunday, February 18, 2007
Inkjet printing on fabric
I was watching B Original the other day and the very unique and talented Michele Beschen showed a quick and easy technique using your ink jet printer to print on fabric, such as table napkins, remnants, etc. It is pretty easy. You just need the following materials: freezer paper, iron, ironing cloth, fabric to print and of course your inkjet printer. You can get freezer paper at your grocery store, it is just standard freezer paper. You will want to cut it down to the typical size of printing paper which is 8 1/2 x 11. If your printer can take larger paper than you can obviously make it bigger. Next, take your fabric and cut it a little larger than the freezer paper. Make sure the fabric isn't too thick of a fabric. Keep in mind that the fabric will be adhered to the freezer paper so they will need to go through the printer. Lay the freezer paper on an ironing board, with the shiny side up. Be sure the shiny side is up or else it won't adhere properly. Place your fabric on top, with the wrong side facing down; the side facing up will be the side that is printed. Cover with a piece of thin ironing cloth, muslin works well. Using a Hot Iron (no steam) press over the piece for about 45 seconds. The fabric should be securely adhered to the freezer paper. Make sure to get the edges and corners to ensure that they're stuck tight. You don't want the fabric to get jammed up in the printer. Trim away the extra fabric so it is the same size as the freezer paper before you try to print on it. Now you are ready to print your desired image on the paper. One extra tip that Michele didn't mention is that you may want to change the paper setting on your printer to something a little thicker vs. the default plain paper setting. Every printer is different so it may be under page setup or you may find the option to change the paper source once you hit print. You could pick a matte photo or anything else that is thicker than plain paper.
I think it would look really cool to take white cloth napkins and put a black and white image on it. This technique is an easy and inexpensive way to create some art work for your walls. Just add a frame and you can have a unique piece of art!
Happy crafting,
Madame Craftsalot
I think it would look really cool to take white cloth napkins and put a black and white image on it. This technique is an easy and inexpensive way to create some art work for your walls. Just add a frame and you can have a unique piece of art!
Happy crafting,
Madame Craftsalot
Tuesday, February 13, 2007
Great Books to read
I am getting ready to take a PMC (Precious Metal Clay) Class next weekend at the local art center and can't wait. So, I went out and bought a book just to get prepared ahead of time. I found this great book called Metal Clay and Mixed Media Jewelry by Sherri Haab. WOW! There are some awesome tips, techniques and finished pieces in it. Just beautiful! Sherri is so talented. She has another book called the Art of Metal Clay. You can find it on the link above. All of the links are to Amazon.com which has new and used copies but there are plenty of other places to buy the books. Anyway, I am so excited for my class and to be able to tackle my first project. I think I am going to really like working with PMC. I have never done it before so I will be sure to report back to you on what it is like and how my project turns out.
On that note, I started thinking of some of the other books that I have and love and wanted to share them with you. Faux Surfaces in Polymer Clay by Irene Semanchuk Dean. I have to be honest and say that I haven't done any polymer clay projects, which is why I bought this book. She has great ideas and instructions on creating cool looking effects for your projects. Look out clay, here I come. Actually, I just remembered something. I took a clay class in high school just to fill an empty slot. I wasn't into art at the time but thought it would be an easy way to get an A. My best friend and I got selected by the teacher to represent our school at the local "Clay-a-thon" competition. It was quite funny because we were not real serious about the class at the time, one of the few who weren't going on to be art majors. I don't remember what kind of clay we used, but I have worked with it in some fashion. Man that was a long time ago. My sister told me that she remembers one project that I made. It was a clay tissue box with a lid. The handle on the lid was a big, fat nose. How funny is that? I have to find it. I bet it is up in my parents attic. What a treasure that would be. Moving on... Photocraft: Cool things to do with Pictures you love. Another one of my hobbies is taking photos ever since I purchased my first digital camera years ago. I love using photo editing software on the computer to manipulate and enhance the images I have taken, whether scenic or of my two beautiful kids. The Photocraft book does exactly what the title indicates. It shows you how to do a lot of cool things with your pictures. I like projects that you can actually use and there are plenty shown in this book. The Paint Effects Bible: 100 recipes for faux finishes by Kerry Skinner. I took a Faux Painting class at a local tech college so this was a great supplement to that course. I tend to forget the steps to all of the techniques that I have learned so this book/bible spells it all out for me. It has detailed instructions and great photographs so that any level painter can achieve the effect that they want. The Complete book of Floorcloths by Kathy Cooper and Jan Hersey. I took a painted floorcloth class at the local art center and was hooked from the start. I am always looking to improve my creative skills and expand my knowledge so I bought this floorcloth book. (She has another one too but I forget the name). It teaches you everything you need to know to create a beautiful work of art for your floor from start to finish. I had the privilege of meeting Kathy Cooper at a local art show. She is so talented and offers classes at her own studio and at the Sawtooth School for Visual Art in Winston Salem, NC. I have taken a number of classes at Sawtooth and they have opened up a whole new world of creativity for me. Check out Kathy's website and you will see how talented she is. I just love her whimsical designs and use of bright colors. Very bold! I personally do a lot of Olde World designs and will have my version of a painted floor canvas as one of my projects down the road, so stay tuned. The Olde World theme suits the style of my house better than the bright colors but the opportunities for color and design on floorcloths is endless so you can do whatever suits your style. So much fun! The Mom Inventors Handbook by Tamara Monosoff. Someone once told me that "wherever there is a problem, there is an invention". This has been a blessing and a curse because now I look at everything that is broken, or that frustrates me, etc. and try to figure out an invention to fix it. This constant brainstorming has caused many sleepless nights for me. I have a ton of ideas that I am not quite sure what to do with so I bought this book to give me direction. It is a wonderful resource for anyone with an idea and aren't sure what the next step should be and it is a pretty easy read. Better Homes & Garden Paint: Ideas & Decorating Techniques is a helpful book if you plan on painting any rooms in the near future. It offers tips on colors and a variety of decorative painting techniques. Salvage Style: 45 Home and Garden Projects using reclaimed architectural details is such a unique book. It takes architectural details and turns them into cool new pieces whether it be art, furniture, etc. I love to re-purpose items, it is very fulfilling to recycle or reuse something that it was not originally intended to do.
All of these books have inspired me to explore and try new things. I invite you to check 'em out and share your thoughts!
Happy crafting,
Madame Craftsalot
Monday, February 5, 2007
Project 1 Recycled Diapers and Wipes Tote

OK, this is a super easy first project and shouldn't take long. It is a fun little idea that I came up with to help recycle something that would normally just be thrown away. There are a few different options for you but the final end use for this particular project is to carry diapers and wipes. There are cute ones on the market right now (Diapees and Wipees is one of them) but why not get crafty and make your own?
What to use? The vinyl and/or plastic packaging from the following: (some have zippers, some don't)
- Plastic/vinyl package from new pillowcases
- Plastic/vinyl package from curtain panels, valences, etc.
- Plastic/ vinyl package from soccer shin guards
Click on the link above for an example of one that I am selling on Etsy. I entered it in the Upcycle contest. I decorated it using a left over gift bag that I received at my baby shower. I included a photo.
Other potential ideas and uses for this packaging are to hold maps in your car, retail store coupons - larger ones like Bed, Bath and Beyond easily fit, a mini restaurant tote for infants/toddlers that holds a disposable place mat, wipes, bib, small snack, toy or something to entertain, etc. , or even a take-out restaurant menu holder. I may add to this as I go as I think of more uses, but this is a good start anyway.
What is upcycling? It is a new trend that I love. According to information posted on Etsy "The word Upcycling was coined by William McDonaugh and Michael Braugart in their book on ecologically intelligent design, Cradle to Cradle. In the simplest terms, upcycling is the practice of taking something that is disposable and transforming it into something of greater use and value. In this contest we challenge all Etsy users to create an object to sell on Etsy that is comprised of materials that would have otherwise ended up in the trash heap. "
Don't you love this idea of upcycling?? I seem to be looking at everything a little differently. So go ahead, get creative and find a use for this great reusable packaging.
To quickly summarize this project:
Materials:
- a recycled plastic/vinyl package as mentioned above
- embellishments: wrapping paper, stickers, gift bags, photos or whatever you have at home and want to use to decorate it
- *Glue - my packaging had pocket sleeves in it already (it was where the company puts the paper insert with the product info. (photo image, size, color etc. of the pillowcases or curtains from when I bought it) so I didn't need to use any glue
- Diaper and wipes or whatever you plan to use this for in the end.
* I didn't need it but you may.
Steps: (If I can even call it this b/c it is so easy)
- Embellish the package with personal photos or any of the ideas/items mentioned above and simply fill it with whatever you are using it for. Voila. You are done! Couldn't be any easier but it is a great way to save a few buck instead of buying one.
Happy Crafting,
Madame Craftsalot
Stay tuned for the next project: Hand painted Time-Out mat for kids
Friday, February 2, 2007
Bi-Weekly Project
I plan to post a project for you the first and third week of every month. That will give you at least two weeks to complete it. That may seem like a long time for some but if you have kids, a two week period seems to fly by before you know it. This will also give me time to test out my project plan if it isn't one that I have already tackled. I will offer a variety of projects that will include techniques such as painting, decoupage, photo transfers, scrapbooking, etc. I like to try to recycle or re-purpose materials and use something a little out of the ordinary in a lot of my projects. I am not afraid to dumpster dive so be prepared. Turning trash into treasure is very gratifying to me. I hope you enjoy my projects and will try to create things that you can actually use. Please feel free to comment or email with questions.
Happy Crafting,
Madame Craftsalot
Happy Crafting,
Madame Craftsalot
Thursday, February 1, 2007
Collage Book to check out
I wanted to pass along the name of the book from the artist that I mentioned in my Photo Transfer post. A big thanks to the "Naughty Secretary Club" for passing along the info. about Josie's book in her comment to me. The name of the book is: Collage Lost And Found: Creating Unique Projects With Vintage Ephemera (Paperback) by Giuseppina Cirincione. If you click on the link above it will go directly to Amazon where they have new and used versions available. I haven't read it yet but will say that Josie is very uniquely creative and talented after watching her on Craft Lab. Her instructions were very easy to follow on TV so I can't see that being any different in print. I am going to check it out!
While you are at it, check out the "Naughty Secretary Club" blog. Wow, what a great source of information and inspiration. There are a ton of great links to explore...I am off to do that now before I have to come back to reality and make some dinner! I wish I liked getting creative in the kitchen as much as I like getting creative in my studio.
Happy Crafting,
Madame Craftsalot
Wednesday, January 31, 2007
Photo Transfer Technique
We have all seen different types of photo transfers done, but this technique really caught my eye. I thought it was very cool and easy. This project came from Craft Lab on HGTV guest Josie Cirincione joins host Jennifer Perkins to create a story box collage. You can click on the title above for a direct link to the entire project. But, I am just going to highlight the photo transfer portion. Josie took a regular piece of packing tape and placed it on top of a black and white copy of a photo. She used a bone folder to burnish the tape on the photo, meaning just really rub it on there and get out any bubbles, etc. Be sure to cut off the excess paper not covered by tape, she said it was easier to work with. Submerge the taped image in warm water until the paper is saturated and can easily be rubbed off with your finger. Take the image out of the water and slowly roll and rub the paper off until it is all gone. Be gentle. Once the paper is gone, just blot it dry to remove any remaining water. The beauty of transferring the image on tape is that the tape still stays sticky! You can add it to your new surface. Josie used a playing card to adhere it to. Trim the excess and voila you have a cool new transferred image. If you have a larger object to transfer she said you could use clear transfer paper. You will have to experiment with different copiers. You can't use an ink jet printer since you are submerging it in water, the image would run. A "fresh" copy would work best rather than one that has been sitting around for awhile. I can't wait to try this technique.
Happy crafting,
Madame Craftsalot
Happy crafting,
Madame Craftsalot
Tuesday, January 30, 2007
Faux Fun - Lampshade

Here is a project that was done on Creative Juice. I have done something similar. They used a typical grocery store brown paper bag for their project. Click on the title for a link to their instructions. I did mine a little differently. I used brown kraft builders paper found at Home Improvement stores. They applied theirs to a lampshade. I applied mine to a store bought plain white art canvas (used for painting). I cut a piece of paper about 2 inches larger than my canvas (in all directions). I used acrylic paint and painted the piece of paper in a light brownish color. Next I wrinkled the paper. Then I used an antiquing glaze over it. It really helped add some texture. Then I ripped the paper which left me with a rough, cool raw looking edge. I applied it to the canvas with wallpaper paste. It looks like real leather b/c of the brown tones that I used. It was a pretty easy project. I recommend trying it. I have seen it applied to chairs, furniture, etc. You can be creative. You can vary the steps depending on what kind of finished look that you want. If you don't want unpainted raw edges, then glaze it after you rip it or if you don't want too much texture, glaze it before you wrinkle it. I also took it one step further and added a brown stencil design just for the heck of it. I included an image of my finished project.
Happy Crafting,
Madame Craftsalot
Monday, January 29, 2007
Painting tips from B Original
I love to paint and one of my favorite shows today has some great tips. Michele Beschen of B Original had a segment on art and painting and once again a had a couple of tricks up her sleeve. One was to take a paint brush (like 1 1/2" or so wider) and wrap elastic bands around the bristles to bind them together and make a few different sections, she did 3. Load your brush and you have an easy way to paint stripes! Love it!
Every crafter is quickly learning that Home Improvement Stores and hardware stores can be a great place to find new tools to be creative. Another great tip from Michelle was to use perforated drywall tape to make a clutch of evenly-spaced dots. Fast and easy dots?!?! I'll try it! She also had some crazy kitchen tools she used to get some funky shapes, so go explore your utensils and get creative.
One final tip that I found useful was on preserving your paint brushes. She suggests to put a little petroleum jelly on the bristles after cleaning to help them retain their shape between uses. Michelle has her own website at http://www.couragetocreate.com/. It is under construction but worth a look! In the meantime, you can also find her on both HGTV and DIY Network as the host of B Original. It is must see TV!
Happy Crafting,
Madame Craftsalot
Welcome
Welcome to my new blog. I am addicted to HGTV and the DIY Network and every creative magazine in between. I have what I like to call "Crafting ADD", meaning I don't like to focus on just one craft; I like to do a whole variety of crafts. It keeps me from getting bored. My goal is to select my top favorite daily tips and projects shown on TV or in some craft magazines. I also want to help you find resources whether it is supplies, magazines, websites, etc. I figured I would share it with others since I am doing it for myself anyway. I welcome any feedback, favorite projects, websites, etc. so please pass them along and I will be sure to share it with you.
Happy crafting,
Madame Craftsalot
You can check out some of my latest creations at http://www.simpleimpressions.etsy.com
Happy crafting,
Madame Craftsalot
You can check out some of my latest creations at http://www.simpleimpressions.etsy.com
Subscribe to:
Posts (Atom)
